Here is my latest addition, I envisaged for this year's festivities at home.
It is a "Toran" - a traditionally made hand-crafted Hanging (normally for the door or window frames inside a house), which I made to decorate the top front of the "mantapam" where we place the Krishna idols, for worship during Krishnashtami/Janmashtami/Gokulashtami celebrations.
A "Mantapam", like this one is generally used to house the idols of the Hindu gods and goddesses we worship, inside a pooja room in our homes.
Here is what the finished piece looks like..
To make this, I used the materials necessary as in this picture.
- Off-white colored medium-sized pearl beads;
- Golden-colored beads, same size as the pearl beads;
- Golden flowers available in craft shops, petals to be folded to form flowers;
- 2-3 different kinds of golden-colored lace trimmings: I have used one 3-cm wide lace piece with no trimmings on the edges, and another 3-cm wide lace piece with trimmings on one edge only.
- Golden rope 3 mm thick;
- Small golden-colored bells;
- Aluminium craft wire 2 mm thick;
- Thick cardboard 5 mm thick;
- Silk fabric of any light brown color;
- Synthetic white glue like Fevicol or Fevibond.

Here is a step-by-step tutorial. First the base..
- Measure your mantapa/frame's width, and cut out a rectangular piece of thick cardboard of about 0.5 cm thickness, and measuring about 5 cm. in breadth, with length equal to your frame's width. My frame measures about a meter in width. This will form the base frame for the toran, from which you will be dangling the beaded strings.
- Cut out a piece of silk cloth the size of your cardboard frame plus 1.5 cm on all sides. Cover your cardboard frame completely with the silk cloth on the front, and glue the ends of the fabric behind the cardboard frame, with white glue/Fevicol/Fevibond. Press firmly and let dry.
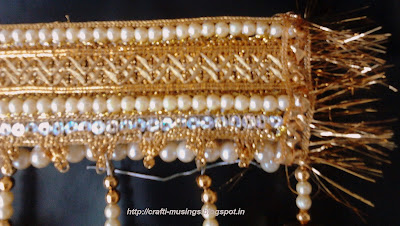
- Glue on a piece of golden string at the top edge of this cardboard frame.
- Glue on a string of medium-sized pearl beads along the entire width of the frame.
- Add then a piece of wide golden lace below this pearl string to cover the entire width of this frame.
- Glue on another string of pearls.
- Glue on the golden lace such that the trimmings on one side hang down the frame.
- This completes your frame base.

Now start with the dangling bead strings:
| Closeup of the one half of the hanging strings of beads with golden flowers.. |
- String a row of pearls, golden flowers and golden beads with the aluminium craft wire in a sequence similar to mine, i.e. 2 golden beads-2 pearls at the top, and then this sequence to be repeated: 1 golden flower-2 pearls-1 golden bead-2 pearls;
- The number of golden flowers is increased from 1 on a string, then 2 and so on to finally 9 flowers on a string. End each string with a golden bell. Curl up the aluminium wire tightly with a pair of pliers, on either end, to prevent the beads from slipping out.
- Make 18 such strings, i.e. 2 strings with 1 flower each, 2 strings with 2 flowers each and so on. This will enable us to form the inverted V-shape for the toran.
- Next string a row of beads, with the aluminium craft wire in the following sequence to be attached to the cardboard base: 2 pearls-1golden bead-2 pearls-1 string of flowers; You can vary the bead numbers here to exactly suit the width of your frame.
- Continue the row to include all the 18 strings of flowers. Make sure you start with the largest number of flowers and end with the 1 flower string right in the middle of the frame. Repeat the same procedure on the other half, to form an inverted V-shape in the middle of the frame.\
- If you need to adjust the ends of the bead row to suit the width of the frame, add a couple of pearls or golden beads on either ends.
- Again, curl up the aluminium wire tightly with a pair of pliers, on either end, to prevent the beads from slipping out.
- Now glue on this row of beads below the lace trimming, onto the cardboard base. Press firmly for a couple of minutes to make sure the row sticks to the base strongly, or else the whole structure may fall off the frame.
- When dry, you could add a bit of a different kind of lace on either edge of the frame, like I did to give some more dazzle, to the toran.
- Finally, if you desire to preserve the sheen, you can give 1-2 coats of clear varnish to the entire thing.
- You could attach the toran to the door/mantapa frame by tying the toran with cord on either edge, or by bending the remaining part of the aluminium wire on either end like I have done here.
| Closeup of the right corner of the toran's base |
I hope I have given my readers enough inspiration and clear instructions to try this out on their own.
Your comments, suggestions and of course any creations based on this idea are welcome to be posted here!
Good luck, and Happy Janmasthami celebrations!


0 comments:
Post a Comment
Want to say something? Go on..